Hey friends! Just got back from a fun, fun girls night out. Almost froze on the way home but it was worth it. Always make time for your friends. That's my lesson of the week. Pretty deep stuff, I know.
Let's party!
This blog contains affiliate links. If you click one and make a purchase, I may make a commission at no additional cost to you. Read more here.
Room Makeovers Galore!
Hey, friends! How's it going? I've been a little bit of a slacky-slackerson blogger lately. Not because I'm lacking stuff to blog about, I actually have too much! I am working on all kinds of fun things for the blog. The problem is that I've got too many projects and nothing is complete.
And, even though I've got plenty of projects, I just keep adding to my list. I recently made one little change to my living room which is turning into a complete makeover!
Oops.
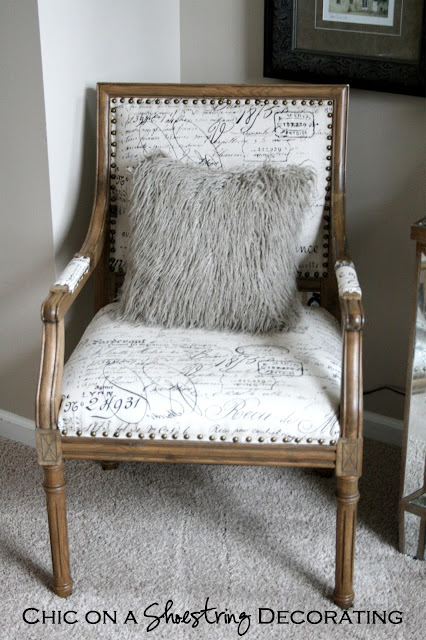
I got a pair of these lovely French script chairs for Christmas. Well, actually... I picked them out and bought them and said they were my Christmas present. Does that count? They were a crazy good deal (of course or I wouldn't have got them!) but more on that later...
These beauties suckered me into adding "living room makeover" to my already long list. I'd been itching to do it anyway so these chairs were the perfect kick start.
So, besides the living room makeover here's what else I'm doing... because inquiring minds want to know.
This could also be called "Home Goals 2013" I guess. It is still January after all...
Redecorate formal dining room:
My mind is always reeling with all of this fun decorating stuff and I love it. I'm glad that I have friends like you that feel the same way. Thanks for your patience with me as I get things done. I'll have some big reveals soon!
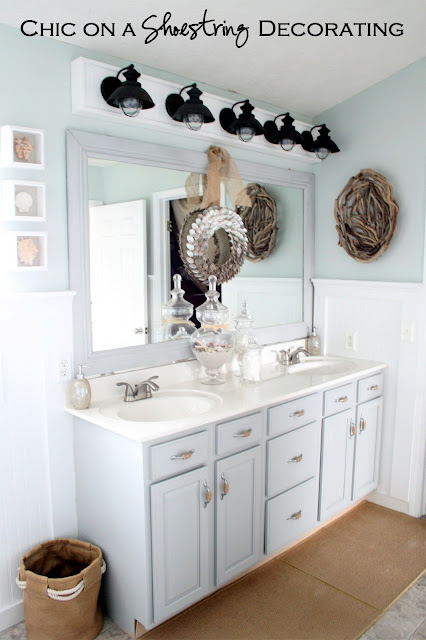
Speaking of big reveals, did you see my beach themed master bathroom reveal? Probably my favorite reveal to date!
And, even though I've got plenty of projects, I just keep adding to my list. I recently made one little change to my living room which is turning into a complete makeover!
Oops.
I got a pair of these lovely French script chairs for Christmas. Well, actually... I picked them out and bought them and said they were my Christmas present. Does that count? They were a crazy good deal (of course or I wouldn't have got them!) but more on that later...
These beauties suckered me into adding "living room makeover" to my already long list. I'd been itching to do it anyway so these chairs were the perfect kick start.
So, besides the living room makeover here's what else I'm doing... because inquiring minds want to know.
This could also be called "Home Goals 2013" I guess. It is still January after all...
To-do List aka: Home Goals 2013
Redecorate formal living room:
- New pillows, curtains, accessories
- New furniture arrangement, selling some old & getting some new
Redecorate formal dining room:
- Painting dining room table and chairs with Annie Sloan Chalk Paint
- Reupholstering chair seats
- Painting curtains?
Makeover #1 son's bedroom "Industrial/Rustic Chic":
- Paint
- Build headboard
- New furniture arrangement
- DIY Decor
Makeover #2 son's nursery to big boy room "Rustic Chic":
- Paint
- Build Headboard
- Paint dresser
- New furniture arrangement
- DIY Decor
Makeover Office/Mom Cave
- I'm not sure if it can be called a makeover because it hasn't ever been "made" since we moved here almost 4 years ago... Sheesh!
Master Bedroom:
- Reading Corner chair & gallery wall
- Paint Dresser with AS Chalk Paint
Family Room:
- Board & Baton install
- New artwork
Foyer:
- Wall treatment (stencil, paint, not sure yet....)
Speaking of big reveals, did you see my beach themed master bathroom reveal? Probably my favorite reveal to date!
Flaunt it Friday 137!
Hello, my friends! Where did this week go?! It's already Flaunt it Friday?
I think I may have been frozen for part of the week and that's why it went so quick. We had a couple days of about 5 degrees but the Weather Channel says it "feels like -15". Brrrr!! And I'm not even in the coldest part of the country!
So... I'm pretty sure that that's what happened. I was frozen so I didn't get much blogging done. Good excuse isn't it.
Now that I'm all thawed out let's party!
Flaunt it Friday 136 and a Winner!
Hello, Hello! Happy Friday! I'm so excited to announce the winner of the 16x20 canvas from Art by CMcDonald. The winner chosen by random.org is #63.
Tracy Cotton Pickin CuteJanuary 16, 2013 at 2:17 AM
Hi Kate. I love the new light fixture and your bathroom is beautiful! Like you I would choose the Midsummer Eve. Beautiful artwork. Thanks for letting me enter the giveaway.
Hugs… Tracy@CottonPickinCute
Hugs… Tracy@CottonPickinCute
Congrats Tracy! I'll be sending you an email. Thanks to everyone for entering. Now, let's party!
How to Build a Bathroom Light Fixture
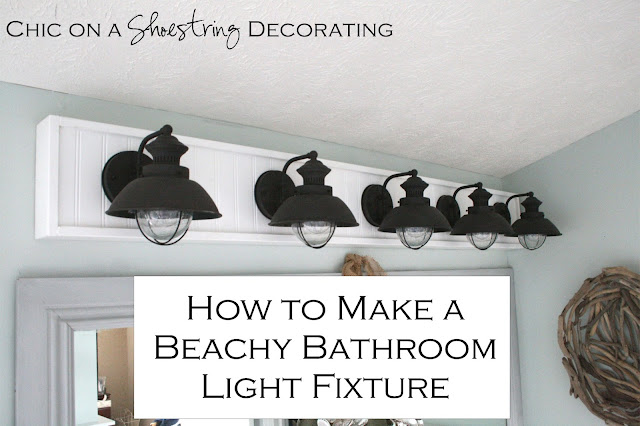
Thank you all for the sweet comments about our beachy master bathroom makeover. Everyone seems to love Mr. Chic's DIY light fixture just as much as me. As promised, here is his tutorial. Take it away Mr. Chic...
When we moved into our house almost 3 years ago, one of the
first things we planned to do was remodel the master bath. Three years later,
we finally got working on it. Mrs. Chic may tell you it was because I
procrastinated….the real issue was the 94 paint colors and design ideas we went
through before deciding we wanted a beach theme that wasn’t didn’t include
shower curtains with fish.
One challenge was how to replace the builder grade, 6 light,
5’ long, hung-too-high light fixture that we hated.
 |
| See how the light fixture is way up by the ceiling... it looked even worse before we added the DIY mirror frame. |
But when we shopped, we found more of the same. We wanted
something long, because we have a long mirror over the vanity. We wanted
something unique but not in a gaudy way. And of course, we wanted it to be
shoestring-able…meaning cheap…I mean…thrifty.
I found a fixture that reminded me of boardwalk lights or ones
you find on a pier along a beach. And our Lowe’s store had them on clearance
for $12.00 a piece. Regularly $44.00.
I made my case to Mrs. Chic that I could build a box out of
scrap wood and MDF, and attach 5 of these lights to make a light fixture nobody
else would have.
So off we went.
I measured and grabbed some scrap MDF. I needed three – a
top, a bottom and the face.
 |
I laid each light fixture on a piece of MDF to get a general
sense of spacing. I traced around the sides of each light once I found spacing
I liked. I found the center of the traced circles and, using my speed square,
made a line from top to bottom. I did this for each light.
Then I used my L-shaped square, and drew a line exactly down
the middle of the MDF, which gave me the center line. Where the vertical line
for the center of the lights, and the line down the center met…is where I’d
drill the holes for wiring.
I wanted about a ¾” reveal between the top and bottom boards and the face board. So I flipped the face board over so I was looking at the bottom. I put scrap MDF underneath which gave me the right amount of reveal.
I wanted about a ¾” reveal between the top and bottom boards and the face board. So I flipped the face board over so I was looking at the bottom. I put scrap MDF underneath which gave me the right amount of reveal.
I glued all the joints and used my brad nailer to tack on the
bottom and top boards. You can see the reveal created by placing boards
underneath the face board.
Since I was going to be working with the box, it was heavy,
and I didn’t want it to fall apart, I used my brad nailer to tack on some scrap
wood to keep everything together while I messed with it.
I screwed the top and bottom pieces to the face every 4
inches on center. Overkill maybe, but I found a brand new box of screws, there
was good music on Pandora, and what else did I have to do? Either way, I didn’t
want this thing coming apart.
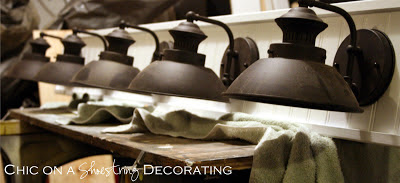
I used construction adhesive to glue a scrap sheet of bead
board on the face and drilled through that too. I filled the screw holes with
wood filler, sanded, primed, and painted the whole thing, then attached the
lights while running the wiring through the holes.
Now…I’m pretty confident around power tools…but
electricity…I'm still learning. So my father-in-law helped and it was easier than
I thought to connect the lights. We just connected the black wire from one
light to the black wire of the one next to it – and so on. Then….the white wire
on each light, to the white wire of the next light.
On the middle light, in addition to it being connected to
the fixtures to the right and left of it, we added an extra, 12” long piece of 12
gauge wire so we could connect the whole thing to the supply line from the
wall.
We killed the power to the switch and pulled off the old
fixture (Mrs. Chic thinks she’ll get $20 for it at a garage sale. I wanted to
put it on the curb).
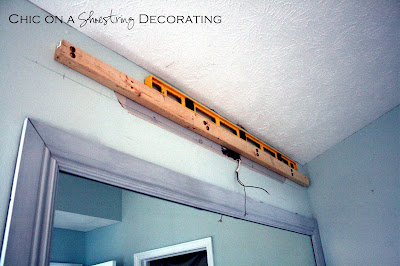
Then, we hung the box on the cleat. We connected the black wire
from the wall to the black wire on the box…and connected the copper ground wire
to a screw in the back of the box.
I drove 6 or 7 screws through the top of the box to attach
it to the cleat, and we were in business!
I knew it worked when Mrs. Chic said she was in love with
it. It’s unique for sure, looks beachy without goldfish, and best of all, it
was about $70 to build over a couple weekends.
Linking: Tatertots & Jello
Art by CMcDonald Canvas Giveaway!
Hi there! Thank you so much for all the kind words about our beachy master bathroom makeover. Mr. Chic just finished up the tutorial about the light fixture he made so I'll be posting that this week. Stay tuned.
Today I'm so excited to be giving away a 16x20 canvas by my lovely sponsor, Art by CMcDonald. She is going to allow you to choose any print you like from her shop. In case you missed it, I have Mid-Summer's Eve hanging in my newly made-over master bathroom and absolutely love it.
This beautiful canvas will be given away in the GBK Celebrity Gifting Lounge at the Golden Globes today! This canvas will be part of their swag... how cool is that?! Just think... you and me and some famous celebrities could all have the same canvas hanging in our homes (if you choose this one)... living large I tell ya. ;)
Art by CMcDonald is very reasonably priced, canvases start at $18. She has free shipping on canvases through the end of today! (Sunday 1/13/13)
Check out her other beautiful pieces...
What a beautiful view...
My favorite color rose...
I love me some Charlie Brown zig-zags Chevron! She has all kinds of pretty chevron colors, would make a great collage on a wall.
There are a few ways to enter...
Today I'm so excited to be giving away a 16x20 canvas by my lovely sponsor, Art by CMcDonald. She is going to allow you to choose any print you like from her shop. In case you missed it, I have Mid-Summer's Eve hanging in my newly made-over master bathroom and absolutely love it.
This beautiful canvas will be given away in the GBK Celebrity Gifting Lounge at the Golden Globes today! This canvas will be part of their swag... how cool is that?! Just think... you and me and some famous celebrities could all have the same canvas hanging in our homes (if you choose this one)... living large I tell ya. ;)
Art by CMcDonald is very reasonably priced, canvases start at $18. She has free shipping on canvases through the end of today! (Sunday 1/13/13)
Check out her other beautiful pieces...
 |
| The Journey Ahead by CMcDonald |
 |
| Summer in the Tetons by CMcDonald |
 |
| Romance in the Garden by CMcDonald |
 |
| Sweet Kisses by CMcDonald |
There are a few ways to enter...
- Go to Art by CMcDonald's site and tell me what canvas you'd pick if you won. (Mandatory)
- Like Art by CMcDonald on Facebook
- Be a Follower of Chic on a Shoestring Decorating
- Subscribe to my RSS Feed (you'll get an email each I blog a new post)
- Like Chic on a Shoestring Decorating on Facebook
Please leave a new comment for each entry. You must do #1 to enter. Winner will be chosen via random.org on Thursday, 1/17/13 at Noon cst.
Best of luck!
Beachy Bathroom Reveal
Hey there, friends. I am so super-duper excited to finally be revealing my master bathroom makeover to you.
I absolutely love it! There are not many rooms in my home that I can say that I love because the decorator in me is always thinking I need to change this or that and being picky over some dumb little detail that no one else would even notice. (I'm working on not being so hard on my decorating self.) But anyway... I really, truly love how our bathroom turned out and I'm so excited to share it with you!
I've gone beachy!
It's my new "happy place". :)
I've got so much to tell you about this bathroom makeover I don't even know where to start?!
How about the beginning so you can see just how far we've come...
We kept a tight budget by keeping the same cabinet/vanity and mirror and doing all of the work ourselves. The vanity was painted Storm Cloud by Sherwin Williams and we made beachy looking pulls with spray paint and jute string. (tutorial to come).
We also framed out our mirror using crown molding we picked up at the local box store. We painted it to match the vanity. A much cheaper option that buying a new mirror or buying a frame.
The cheap, little, white square tiles that surrounded the tub are now covered by beautiful beadboard and wide trim.
My amazingly talented hubby designed and made this beautiful one-of-a-kind light fixture. The lamp fixtures remind us of a the kind you'd find on a beach boardwalk. Tutorial for how to make a beachy light fixture can be found here.
I love all of the gray and white-washed tones of the driftwood and the texture it adds to the wall.
The sand and shells in the largest apothecary jar are from our favorite beach, Sanibel Island. (except the starfish, bought that one) If you've ever been to Sanibel Island you know that I could've easily filled all 3 of these jars overflowing with shells. There are a freakishly large amount of shells on Sanibel. They wash up in huge piles lining the shore. Anyway, I probably broke several federal and state laws about taking sand with me but this is all the sand collected from inside our swimsuits, beach bags, cooler, beach towels, flip-flops and rental car. Sand gets stuck everywhere! ;)
I had to buy these bad boys too, who knew that TJ Maxx would start selling bags of starfish right when I needed them. Seriously, I bought these at TJ Maxx in the Midwest. Crazy.
This cute little beachy burlap and rope basket was another TJ Maxx find. It's great to stash my extra towels and bubble bath. The cheezy fish picture frame is from our first beach trip together back in college to Sanibel Island. Because I'ma pack rat sentimental, I saved it.
I picked the frame up back then at an equally cheezy beach store. You know, one of those places that sells swimsuit cover-ups with cartoon bikini bodies on the front and inappropriate post cards with totally 80's beef cake guys with feathered hair and speedos. This trip was the first of many that we went and stayed with my grandparents over Christmas break while we were dating. Some of the most fun vacations ever... no real job, no mortgage, no kids, no responsibilities. Just fun times. PS: Jean shirts are coming back in style, does that make me old or classically stylish? :)
I bought this valance at least 8 years ago. 8 years!! Oh jeez, don't tell Mr. Chic. I know I've had it that long because I bought it for my first born's nursery. It ended up not working in there but I kept it because I thought it was really cute. And it is. And, it's totally beachy-looking and perfect for my bathroom. I paid $3 for it. Yeah, $3 whopping dollars. And, it's Nautica, not some cheap off-brand junk. (clearance at TJ's) That's why I kept it for 8 years. Now it's perfect. Good thing I'm apack rat saver!
I absolutely love it! There are not many rooms in my home that I can say that I love because the decorator in me is always thinking I need to change this or that and being picky over some dumb little detail that no one else would even notice. (I'm working on not being so hard on my decorating self.) But anyway... I really, truly love how our bathroom turned out and I'm so excited to share it with you!
I've gone beachy!
Cool and calm...
I've got so much to tell you about this bathroom makeover I don't even know where to start?!
How about the beginning so you can see just how far we've come...
We kept a tight budget by keeping the same cabinet/vanity and mirror and doing all of the work ourselves. The vanity was painted Storm Cloud by Sherwin Williams and we made beachy looking pulls with spray paint and jute string. (tutorial to come).
We also framed out our mirror using crown molding we picked up at the local box store. We painted it to match the vanity. A much cheaper option that buying a new mirror or buying a frame.
The cheap, little, white square tiles that surrounded the tub are now covered by beautiful beadboard and wide trim.
My amazingly talented hubby designed and made this beautiful one-of-a-kind light fixture. The lamp fixtures remind us of a the kind you'd find on a beach boardwalk. Tutorial for how to make a beachy light fixture can be found here.
I almost didn't buy this amazing wreath made of real clam(?) shells. SO glad I did! I love the texture and color it adds to the mirror.
We made the towel hooks out of salvaged trim from an old building. I picked the trim up for a few bucks each at a flea market. And who can pass up these pretty blue glass fishing floats that are showing up all over in design. Both from TJ Maxx for less than $9 each!
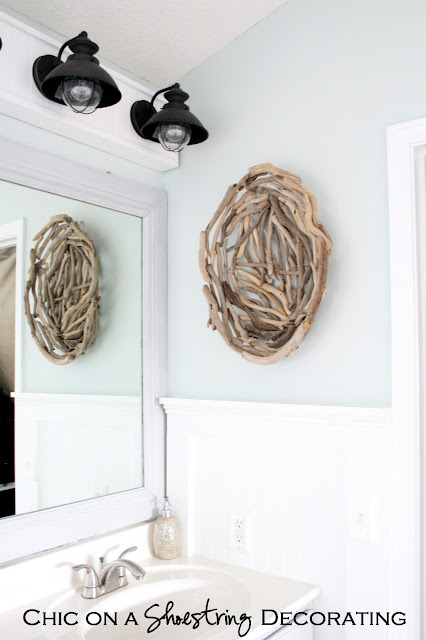
I made some natural, beachy-looking art from a clearance aisle driftwood bowl. No, I didn't really "make it" as in assemble the driftwood into a oblong piece. One of my biggest Chic on a Shoestring budget rules is to never make something if I can buy it for less than I can make it. Smart, huh? I kind of "made it" into art by wrapping some jute rope around one of the sticks and hanging it on the wall. It was a drift wood bowl type tray thing (I think?). Now it's "driftwood art".
I found this beachy tray thing at HomeGoods on Michigan Ave. in downtown Chicago. Funny place to find such a coastal-inspired piece, I think not! There is a beach just a few blocks away. ;) I think it had been ignored for a while in the store because people didn't know what the heck it was. It was one of those sad pieces stuffed down in the bottom shelf with random clearance junk on it. I decided it would make the perfect wall hanging in my coastal inspired bath room. I think it did.
Mr. Chic is not a fan of my "Charlie Brown towels" as he likes to call them. I told him he doesn't know good chevron when he sees it. These towels were my inspiration for the whole room! I'm not sure how it looks on your computer screen but the towel blue/green color is just a few shades darker than the wall. My computer is making the walls look a sage green tone and they are NOT sage... they are Sea Salt by Sherwin Williams, in case you wanted to know.
I had to buy these bad boys too, who knew that TJ Maxx would start selling bags of starfish right when I needed them. Seriously, I bought these at TJ Maxx in the Midwest. Crazy.
This cute little beachy burlap and rope basket was another TJ Maxx find. It's great to stash my extra towels and bubble bath. The cheezy fish picture frame is from our first beach trip together back in college to Sanibel Island. Because I'm
I picked the frame up back then at an equally cheezy beach store. You know, one of those places that sells swimsuit cover-ups with cartoon bikini bodies on the front and inappropriate post cards with totally 80's beef cake guys with feathered hair and speedos. This trip was the first of many that we went and stayed with my grandparents over Christmas break while we were dating. Some of the most fun vacations ever... no real job, no mortgage, no kids, no responsibilities. Just fun times. PS: Jean shirts are coming back in style, does that make me old or classically stylish? :)
This beautiful canvas is the first thing you see when you walk in the bathroom. It looks like it was taken at my favorite beach and I just love it. It was photographed by my talented sponsor, Catherine McDonald. .
I love vintage Ball jars, especially in this blue color. I added some bath salt and some fake candles (I live with little boys, safety first!) and made some votive holders. I like that I can put the lid on and enjoy the pretty patina of it.
I bought this valance at least 8 years ago. 8 years!! Oh jeez, don't tell Mr. Chic. I know I've had it that long because I bought it for my first born's nursery. It ended up not working in there but I kept it because I thought it was really cute. And it is. And, it's totally beachy-looking and perfect for my bathroom. I paid $3 for it. Yeah, $3 whopping dollars. And, it's Nautica, not some cheap off-brand junk. (clearance at TJ's) That's why I kept it for 8 years. Now it's perfect. Good thing I'm a
We saw jute wrapped drawer pulls somewhere in blogland by some creative person who needed to cover her dated porcelain bead pulls. (tell me if you know and I'll link her up!) We'll have a tutorial on these beachy cabinet handles. I love the texture and color they add to our builder grade vanity.
Cute beachy votive holders line the tub and give off a cozy glow.
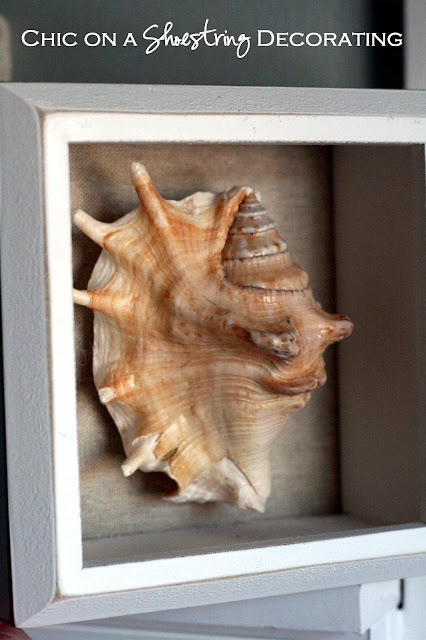
Another "why make it if you can buy it for less" Chic on a Shoestring moment with these lovely real shell shadow boxes, lined with linen looking fabric, from of all places... Kohls! 50% off and I had a 30% off coupon making them about $6 bucks each.... couldn't make 'em for that!
Love the pop of color these add.
So, do you want the skinny on my budget friendly beachy bathroom makeover? I thought you might. Some of these are repeats from above but this puts it all in one tidy list.
- Paint Color: Sherwin Williams Sea Salt
- Cabinet Paint Color, DIY Mirror Frame and Towel Hooks: Sherwin Williams Storm Clouds (tutorial to follow)
- Beadboard Paint Color: generic Lowe's glossy white for trim and doors.
- Chevron Towels: Sonoma Brand from Kohls (but I think they are discontinued, I couldn't find them online anymore.) :(
- Clam(?) Shell Wreath: TJ Maxx
- Driftwood Wall Art: HomeGoods
- Reclaimed Wood Trim Pieces: Antique flea market Hooks: Lowes (tutorial to follow)
- Large & Small Star Fish: Large were purchased at a Florida beach side store but now both sizes available TJ Maxx.
- Vintage Style Glass Fishing Net Floats: TJ Maxx
- Glass Apothecary Jars: TJ Maxx
- Mirror over tub: TJ Maxx
- Mid Summer's Eve canvas by Catherine McDonald
- Curtain Valance: Nautica brand from TJ Maxx
- Burlap-ish Waste Basket and Towel Basket: TJ Maxx
- Sisal Rugs: TJ Maxx
- Light Fixture Lamps: Lowes, they were clearanced out in our store for $12 a piece! The price is much higher online. (tutorial to follow)
- Shell Shadow Boxes: Kohls (not available online at this time)
- Glass Tea Light Holders: Gordmans
- Cabinet Pulls: Ebay (tutorial to follow)
- Beadboard and Trim: Lowes (tutorial to follow)
I hope you enjoyed my beachy bathroom reveal and it's many pictures. I'll be sharing some tutorials in the near future so stay tuned.
What are you making over in your home? It will be worth it, I promise! :)
Linking: Tatertots & Jello, Home Stories A to Z
Flaunt it Friday 135!
Hey party animals! I fixed my party button so you can now copy and paste the code into your blog (text links are fine, too). Thank you!
So, I am ready to celebrate!
Do you know why...
Because I lost 10 lbs.?
No.
Because I won the lottery?
Nope.
Because I'm going to Disney World?
Not this year.
I am ready to celebrate becauseI Mr. Chic and I finally finished our master bathroom makeover!
Whoopee!!
It only took us a year so it is definitely worth celebrating. I'm working on my big reveal post and I'm super excited. I'm planning on posting it Friday evening. It will be followed up Sunday with an exciting giveaway of a piece of art from my lovely sponsor, Catherine McDonald. So, please come back and tell me you love it and you want your bathroom to look just like it. That will make me feel really good. hahaha ;)
Ok, let's party!
So, I am ready to celebrate!
Do you know why...
Because I lost 10 lbs.?
No.
Because I won the lottery?
Nope.
Because I'm going to Disney World?
Not this year.
I am ready to celebrate because
Whoopee!!
It only took us a year so it is definitely worth celebrating. I'm working on my big reveal post and I'm super excited. I'm planning on posting it Friday evening. It will be followed up Sunday with an exciting giveaway of a piece of art from my lovely sponsor, Catherine McDonald. So, please come back and tell me you love it and you want your bathroom to look just like it. That will make me feel really good. hahaha ;)
Ok, let's party!
Book Study Info! 31 Days to Build a Better Blog
Hi everyone! Next week we'll start our book study of ProBlogger Darren Rowse's book 31 Days to Build a Better Blog.
I've been skipping ahead through the book and it is good stuff.
Really good stuff.
Stuff that I hadn't heard of or thought of to grow my blog. In my opinion the investment in buying this book is completely worth the money if you want to take your blog to the next level.
If you haven't picked up your ebook there is still time...
Click the "Buy Now" below the button to get your ebook, you'll need it for our study.

In doing a book study with you guys I'm hoping we can learn even more... 2 heads are better than 1, right? I've set up a message board forum on my blog where we can discuss, ask questions, and pick each other's brains about what we're learning in this book.
The book study will take place in the forum linked here, it is up and running. You'll need to register to be able to post in the forum. It asks for you to create a user name and password and requires your email. Feel free to start a conversation about the book study or whatever else sounds like fun. Decorating talk anyone?
I am going to schedule 2 times a week where we can meet up and discuss. One time will be in the evening and one time will be during the day so hopefully one will work for you. If you miss you'll be able to go into the forum and read the conversations and post a question or add information if you'd like.
Week 1 Book Study Forum Dates:
Wednesday, January 16 at 9:00 PM CST. *CST is Chicago time
Thursday, January 17 at 2:00 PM CST.
Homework: Try to complete days 1-7 of the book. If you can't complete the assignments for each day make sure you at least read through the days. If you have questions or advice please feel free to leave a message in the forum before our first meeting.
I'm really looking forward to doing this book study and getting to know some of you a little better! Thanks for joining me... can't wait!
*this post contains affiliate links
**this book study is not affiliated with or sponsored by ProBlogger
I've been skipping ahead through the book and it is good stuff.
Really good stuff.
Stuff that I hadn't heard of or thought of to grow my blog. In my opinion the investment in buying this book is completely worth the money if you want to take your blog to the next level.
If you haven't picked up your ebook there is still time...
Click the "Buy Now" below the button to get your ebook, you'll need it for our study.

In doing a book study with you guys I'm hoping we can learn even more... 2 heads are better than 1, right? I've set up a message board forum on my blog where we can discuss, ask questions, and pick each other's brains about what we're learning in this book.
The book study will take place in the forum linked here, it is up and running. You'll need to register to be able to post in the forum. It asks for you to create a user name and password and requires your email. Feel free to start a conversation about the book study or whatever else sounds like fun. Decorating talk anyone?
I am going to schedule 2 times a week where we can meet up and discuss. One time will be in the evening and one time will be during the day so hopefully one will work for you. If you miss you'll be able to go into the forum and read the conversations and post a question or add information if you'd like.
Week 1 Book Study Forum Dates:
Wednesday, January 16 at 9:00 PM CST. *CST is Chicago time
Thursday, January 17 at 2:00 PM CST.
Homework: Try to complete days 1-7 of the book. If you can't complete the assignments for each day make sure you at least read through the days. If you have questions or advice please feel free to leave a message in the forum before our first meeting.
I'm really looking forward to doing this book study and getting to know some of you a little better! Thanks for joining me... can't wait!
*this post contains affiliate links
**this book study is not affiliated with or sponsored by ProBlogger
2012 Year End Review
Hi there! Well, we're almost a week into 2013 so I've been thinking about some things I'd like to get accomplished this year. I have a pretty big list and was feeling pretty overwhelmed by what I need would like to get done this year.
Did I even do anything last year? Is my list so big every year? Am I setting myself up for failure with these?
To answer my questions... Yes, Yes and Yes. ;)
I decided to look at what I did in 2012 and it made me feel better... Mr. Chic and I really got a lot done. We even knocked off several things on our 2012 Home Goals list that you can read here after having a total fail on the 2011 Home Goals list. We completed a lot of them but some I haven't posted about yet.
So, what did I do you ask? Here are the highlights of 2012 in case you missed it:
We (mainly Mr. Chic, I supervised ;) sanded and stained our out-dated oak stair railings and banisters. This made a huge difference in our home... it is the first thing you see when you walk in the front door and it really looks so much better.
I finally revealed my monochromatic master bedroom makeover and how to make an upholstered headboard. I will be sharing the other side of the bedroom sometime this year.
We changed out our kitchen hardware, easy and inexpensive but makes a big impact.
We finished our crown molding and I got a new rug!
Did some fun projects with my boys, this was my favorite... Water Color Word Art for Kids.
I had the most successful garage sale I've ever had earning over $80 an hour and I've shared my tips in Garage Sale 101: How to have a Successful Garage Sale. Check out all those empty bins...
I got a little techy and shares some ways you can keep your blog posts from being stolen by blog thieves (losers!)
I shared a DIY burlap wreath tutorial.
I shared more about me here, even though I don't like talking about myself. I want to be your friend. Still thinking about switching to Katie.... ;)
I did a series called 31 Days of Decorating on a Shoestring Budget. Quite the challenge to post 31 days in a row. Next year I need to start earlier...
I started the series Organizing and Decluttering for Unorganized and Cluttery People. Inexpensive, easy, no-frills organizing for people that don't have time or patience for "fancy" organization. Click the button to see all my organizing posts from 2012.
I finally built a Home Tour but haven't added all the rooms yet, many will be added early this year!
And finally, I was honored and very flattered to be featured at some very awesome places...
DIY Network pictures 14-15
American Profile Magazine under "Eye catcher"
Tatertots & Jello my burlap wreath tutorial featured above
Thrifty Decor Chick my master bedroom makeover
I Heart Organizing my counter clutter buster organizing basket
Design Dazzle kids watercolor art featured above and kids handprint Christmas tree
Looking back on 2012 I'm pretty happy with what Mr. Chic and I accomplished with our home and how much I was able to blog. Through the year I sometimes am discouraged that I'm not posting enough or not getting enough projects done. I think this is pretty common feeling in the blogging world, we see some bloggers who are able to post amazing projects almost everyday of the year and we wonder why we can't keep up.
I have to remind myself that I'm not a full-time blogger... not even close. I'm a full-time mom with a little one at home. I'm a wife and a daughter and a friend. These are my priorities. I'm a part-time interior decorator and I blog for fun when I can. I try to do it regularly but I can't do it everyday and I shouldn't expect myself too. I'm starting 2013 reminding myself that there is no pressure in blogging, just to continue to do what I love and share it with you. No comparisons!
You do the same! :)
Did I even do anything last year? Is my list so big every year? Am I setting myself up for failure with these?
To answer my questions... Yes, Yes and Yes. ;)
I decided to look at what I did in 2012 and it made me feel better... Mr. Chic and I really got a lot done. We even knocked off several things on our 2012 Home Goals list that you can read here after having a total fail on the 2011 Home Goals list. We completed a lot of them but some I haven't posted about yet.
So, what did I do you ask? Here are the highlights of 2012 in case you missed it:
We (mainly Mr. Chic, I supervised ;) sanded and stained our out-dated oak stair railings and banisters. This made a huge difference in our home... it is the first thing you see when you walk in the front door and it really looks so much better.
 |
| Click here to see the tutorial of how to stain your stair railings. |
I finally revealed my monochromatic master bedroom makeover and how to make an upholstered headboard. I will be sharing the other side of the bedroom sometime this year.
We changed out our kitchen hardware, easy and inexpensive but makes a big impact.
We finished our crown molding and I got a new rug!
Did some fun projects with my boys, this was my favorite... Water Color Word Art for Kids.
I had the most successful garage sale I've ever had earning over $80 an hour and I've shared my tips in Garage Sale 101: How to have a Successful Garage Sale. Check out all those empty bins...
I got a little techy and shares some ways you can keep your blog posts from being stolen by blog thieves (losers!)
I shared a DIY burlap wreath tutorial.
I shared more about me here, even though I don't like talking about myself. I want to be your friend. Still thinking about switching to Katie.... ;)
I did a series called 31 Days of Decorating on a Shoestring Budget. Quite the challenge to post 31 days in a row. Next year I need to start earlier...
| Click the button to see series |
I started the series Organizing and Decluttering for Unorganized and Cluttery People. Inexpensive, easy, no-frills organizing for people that don't have time or patience for "fancy" organization. Click the button to see all my organizing posts from 2012.
| Click button to see series. |
I finally built a Home Tour but haven't added all the rooms yet, many will be added early this year!
| click button for tour |
DIY Network pictures 14-15
American Profile Magazine under "Eye catcher"
Tatertots & Jello my burlap wreath tutorial featured above
Thrifty Decor Chick my master bedroom makeover
I Heart Organizing my counter clutter buster organizing basket
Design Dazzle kids watercolor art featured above and kids handprint Christmas tree
Looking back on 2012 I'm pretty happy with what Mr. Chic and I accomplished with our home and how much I was able to blog. Through the year I sometimes am discouraged that I'm not posting enough or not getting enough projects done. I think this is pretty common feeling in the blogging world, we see some bloggers who are able to post amazing projects almost everyday of the year and we wonder why we can't keep up.
I have to remind myself that I'm not a full-time blogger... not even close. I'm a full-time mom with a little one at home. I'm a wife and a daughter and a friend. These are my priorities. I'm a part-time interior decorator and I blog for fun when I can. I try to do it regularly but I can't do it everyday and I shouldn't expect myself too. I'm starting 2013 reminding myself that there is no pressure in blogging, just to continue to do what I love and share it with you. No comparisons!
You do the same! :)

